
上篇文章已经实现了如何设置 Webhook 并实现 复读 功能,但是仅仅是这样显然是不够的,为了让 Bot 功能更强大,程序更具有健壮性,我们可以将 Bot 与 SpringBoot 整合。
基于 Bot 接口是 HTTP 协议的,所以不管是什么语言,整合起来都是没有什么困难的。比如说 Python ,Telegram 官方甚至提供了SDK。
依赖引入
- 首先是
springboot-starter
	<parent>
          <groupId>org.springframework.boot</groupId>
          <artifactId>spring-boot-starter-parent</artifactId>
          <version>2.4.0</version>
          <relativePath/>
	</parent>

        <!--SpringBoot-->
        <dependency>
            <groupId>org.springframework.boot</groupId>
            <artifactId>spring-boot-starter-web</artifactId>
        </dependency>
- Http 使用
kevinsawicki的包
	<!--http调用-->
        <dependency>
            <groupId>com.github.kevinsawicki</groupId>
            <artifactId>http-request</artifactId>
            <version>5.6</version>
        </dependency>
- JSON工具包也不能落下
	<!--JSON转换-->
        <dependency>
            <groupId>com.alibaba</groupId>
            <artifactId>fastjson</artifactId>
            <version>1.2.75</version>
        </dependency>
Webhook 设置
setWebhook Use this method to specify a URL and receive incoming updates via an outgoing webhook. Whenever there is an update for the bot, we will send an HTTPS POST request to the specified URL, containing a JSON-serialized Update. In case of an unsuccessful request, we will give up after a reasonable amount of attempts. Returns True on success.
根据 Telegram 要求,要使用 Webhook 功能,消息接受服务器必须具有 HTTPS 协议的 URL 。
一般来说,购入一个境外域名,并通过 frp 穿透到境外服务器,再购入 SSL 证书即可解决上面这个问题。
接口设计
那么到这一步,基本懂 Spring 的都知道如何进行接下来的开发了。
首先,设计一个接口,通过 Map<String, Object> 接受所有 Webhook 的 update 消息(json格式)。
@PostMapping("/webhook")
public void webhook(@RequestBody Map<String, Object> webhookData) {
	JSONObject json = JSON.parseObject(JSON.toJSONString(webhookData));
	System.out.println(json);
}
尝试发送一条文字消息。
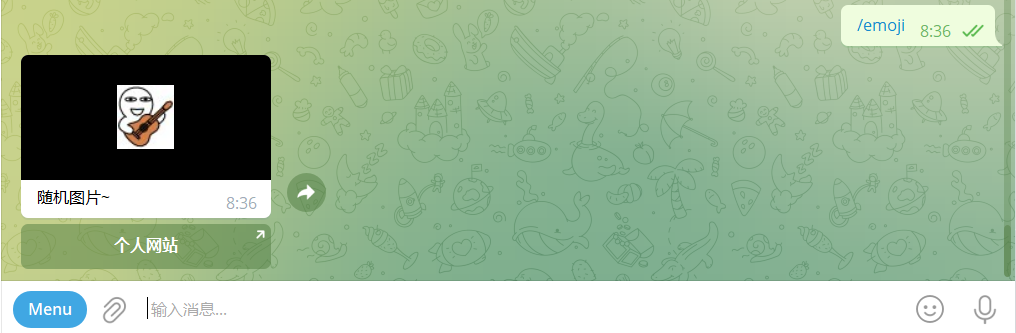
查看控制台打印,可以看到类似这样的 json 结构
{
  "message": {
    "chat": {
      "id": 111,
      "type": "private",
      "username": "xx",
      "last_name": "x",
      "first_name": "x"
    },
    "date": 1660264576,
    "from": {
      "id": 12,
      "is_bot": false,
      "username": "xx",
      "last_name": "x",
      "first_name": "x",
      "language_code": "zh-hans"
    },
    "text": "/emoji",
    "entities": [
      {
        "type": "bot_command",
        "length": 6,
        "offset": 0
      }
    ],
    "message_id": 1
  },
  "update_id": 13
}
其中 text 就是发送的消息内容
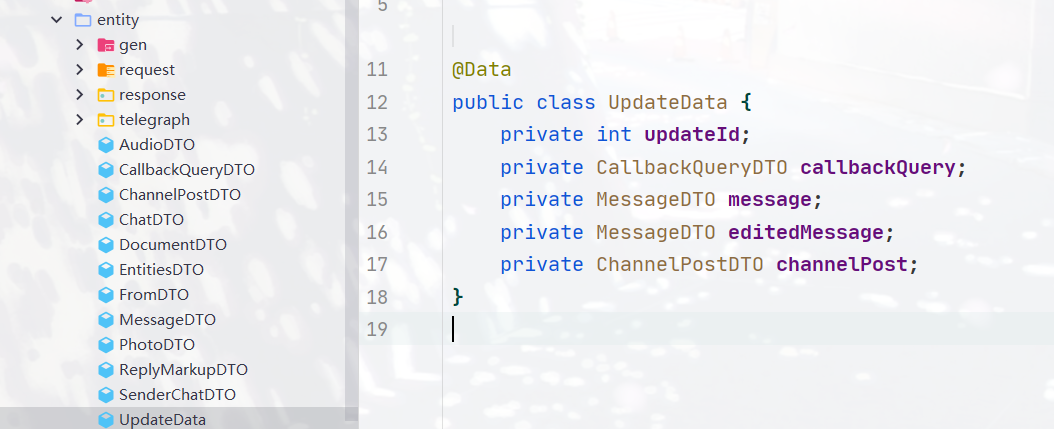
接下来依据 json 结构编写实体类,这里可以使用 GsonFormatPlus 工具自动生成
返回消息
sendMessage Use this method to send text messages. On success, the sent Message is returned.
向 sendMessage 接口发送 POST 请求,并携带 chat_id、text 这两个必要参数,即可向指定账户发送消息(其中 chat_id 从上述 json 中获取)。
先写一个 Http 客户端
public static String doPost(String api, Map<String, Object> sendData) {
        return HttpRequest.post(BOT_URL + api)
                .useProxy(PROXY_IP, PROXY_PORT)
                .trustAllCerts().trustAllHosts()
                .connectTimeout(60000)
                .readTimeout(60000)
                .form(sendData)
                .body();
    }
构造 sendData 并调用 dopost(sendData) 方法
Map<String, Object> sendData = new HashMap<>();
        sendData.put("text", "收到了哦~");
        sendData.put("chat_id", chatId);
        chatHandler.doPost(sendData);
执行 Http 请求后,我们可以接收到回调数据
{
  "ok": true,
  "result": {
    "chat": {
      "id": 123,
      "type": "private",
      "username": "xx",
      "last_name": "x",
      "first_name": "x"
    },
    "date": 1660264578,
    "from": {
      "id": 123,
      "is_bot": true,
      "username": "xxBot",
      "first_name": "xxBot"
    },
    "photo": [
      {
        "width": 46,
        "height": 51,
        "file_id": "123",
        "file_size": 1731,
        "file_unique_id": "123"
      }
    ],
    "caption": "随机图片~",
    "message_id": 12,
    "reply_markup": {
      "inline_keyboard": [
        [
          {
            "url": "http://blog.philomel.top/",
            "text": "个人网站"
          }
        ]
      ]
    }
  }
}
至此,我们已经初步了解了如何使用 SpringBoot 对 Bot 进行开发,其他的接口也相对来说没有什么太大的难度。
但是使用过一段时候后会发现,Bot 限制还是比较多的,上传、下载都非常不方便。接下来的文章我会介绍 Telethon 这款客户端接口,该接口基本与客户端权限一致,用代码的方式直接控制我们的账户。